Simplified Guide to Floating Engineered Wood Flooring Installation

Explore our easy-to-follow guide on installing floating engineered wood flooring for a perfect finish.

The floating method is one of the most popular ways to install engineered wood flooring, especially for DIY enthusiasts. It involves connecting the planks without glue or nails, allowing the floor to “float” over the subfloor. This technique is known for its ease, cost-effectiveness, and adaptability to various subfloors, making it ideal for beginners and seasoned DIYers.

This guide will explore everything you need to know about the floating method, from preparation to installation and troubleshooting, ensuring you achieve a flawless finish for your engineered wood flooring.

Understanding the Floating Method

What is the Floating Method?

The floating method involves locking engineered wood planks together using a click-lock system, with the flooring resting on top of an underlay rather than being fixed to the subfloor. This creates a stable yet flexible surface that adapts to minor subfloor imperfections.

Benefits Compared to Other Techniques

  • Glue-Down Method: While sturdy, this method can be messy and time-consuming.
  • Nail-Down Method: Requires specialist tools and is less forgiving on uneven surfaces.
  • Floating Method: Easier to install, quicker to complete, and avoids permanent fixes, making it perfect for temporary or rental spaces.

Ideal Scenarios for the Floating Method

The floating method works best for:

  • Rental Properties: Easily removable without damaging the subfloor.
  • Quick Renovations: No waiting for adhesives to dry.
  • Uneven Subfloors: These are compatible with underlays that compensate for minor imperfections.
Preparing for Installation

Preparing for Installation

Tools and Materials Checklist

Before starting, gather the following:

  • Underlay (moisture-resistant or soundproofing options)
  • Engineered wood planks
  • Spacers
  • Tape measure
  • Saw (preferably a fine-tooth saw)
  • Pencil and straight-edge
  • Rubber mallet
  • Vacuum cleaner

Subfloor Preparation

A clean, level subfloor is essential for a smooth installation:

  1. Clean Thoroughly: Remove dust, dirt, and debris using a vacuum cleaner.
  2. Check for Levelness: Use a spirit level to identify any uneven spots.
  3. Address Issues: Fill cracks and level minor dips with a self-levelling compound. Ensure the subfloor is dry to prevent moisture damage.

Acclimating the Flooring

Engineered wood needs to acclimate to the room’s environment:

  • Leave the unopened flooring packs in the room for at least 48 hours.
  • Maintain consistent temperature and humidity during this period to minimise the risk of warping.

Step-by-Step Guide to Installing Engineered Wood Flooring

Step 1: Lay the Underlay

  1. Choose the Right Underlay: Consider moisture-resistant options for concrete subfloors or soundproofing underlays for multi-storey homes.
  2. Position the Underlay: Roll it across the room, ensuring no overlaps. Tape the edges together for stability.

Step 2: Start Laying the Planks

  1. Begin at a Straight Wall: Choose the longest, straightest wall as your starting point.
  2. Use Spacers: Place spacers between the planks and the wall to allow for expansion gaps.

Step 3: Locking the Planks Together

  1. Click-Lock Mechanism: Align the tongue of one plank with the groove of another and click them into place.
  2. Secure the Fit: Use a rubber mallet and tapping block to ensure a snug connection without damaging the edges.

Step 4: Handling Obstacles

  1. Cutting Around Door Frames and Vents: Measure carefully and use a fine-tooth saw for precise cuts.
  2. Mark and Measure: Ensure cuts align perfectly with obstructions.

Step 5: Finishing Touches

  1. Trim Excess Underlay: Neatly cut any overhanging underlay.
  2. Install Skirting Boards or Beading: Cover the expansion gaps for a polished look.
Common Challenges and How to Overcome Them

Common Challenges and How to Overcome Them

1.  Uneven Subfloors

  • Quick Fixes: Use an appropriate underlay to compensate for minor imperfections.
  • When to Call a Professional: If issues persist despite levelling efforts.

2. Gaps or Misaligned Planks

  • Identifying Errors: Gaps indicate improper alignment; adjust immediately.
  • Correction: Use a tapping block to realign planks.

3.  Warped or Damaged Planks

  • Inspect planks before installation and set aside any that are visibly damaged.

Post-Installation Maintenance Tips

Cleaning and Protecting Your Flooring

  • Use a soft-bristled broom or vacuum cleaner with a hardwood floor attachment.
  • Avoid abrasive cleaning tools and harsh chemicals.

Maintaining Expansion Gaps

  • Regularly check the gaps to ensure the floor isn’t expanding or contracting excessively.

Products to Avoid

  • Steer clear of wax-based or ammonia-based cleaners that can dull the finish.

Pro Tips for a Flawless Installation

  • Acclimation Hacks: Open the flooring packs slightly to improve airflow during acclimation.
  • Accurate Cuts: Use a mitre saw for precise angles and clean edges.
  • Alignment Tricks: Start each row with a plank at least 20 cm longer or shorter than the adjacent row for a staggered effect.

Ready to Float Your Way to Stunning Floors?

With its simplicity and versatility, the floating method is a fantastic way to install engineered wood flooring. Whether upgrading your home or tackling a DIY project, this guide equips you with all the knowledge needed for success. 

The Flooring Masters are your go-to experts for engineered wood flooring. With a wide range of sustainable and high-quality options, we provide free samples to help you find the perfect match. Our end-to-end service ensures you have expert advice at every step, making your flooring project seamless and stress-free.

MORE ARTICLES

  • Mon - Fri: 9am - 7pm

    Sat: 9am - 5pm

    Sunday: closed

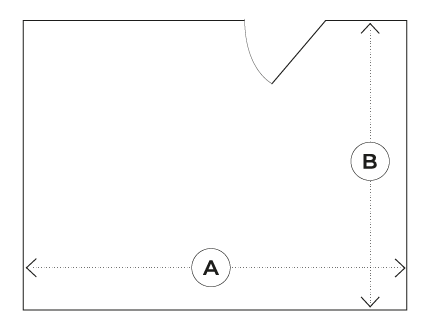
    How to measure my room

    Example One: Rectangle Rooms

    Example Two: Odd Shaped Rooms
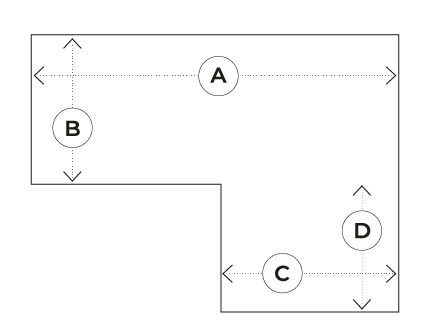
    Don't forget to add an extra 10%
    to the total area(m2) to account for any wastage