Herringbone flooring is one of those styles that immediately adds a touch of sophistication and timeless beauty to any room. But with its intricate pattern, many homeowners wonder: “Herringbone flooring looks stunning, but isn’t it a pain to install?”
The short answer: Yes, it’s tricky. But don’t let that scare you off! Installing herringbone-engineered wood flooring is more manageable than you might think, and with the proper preparation and patience, you can achieve professional-looking results. This guide will walk you through every step, making the process as straightforward as possible.
Here’s what you can expect from this guide:
Ready to get started? Let’s dive in.
Before you begin, ensure you have the right tools and materials for the job. Here’s what you’ll need:

A successful herringbone flooring installation starts with a clean and level subfloor. Ensure that debris, dust, or old flooring materials are cleared before you begin. The subfloor must be flat, dry, and in good condition for the best adhesion and stability. If moisture is a concern, install a barrier to prevent damage to your new flooring.
Engineered wood is sensitive to temperature and humidity changes, so acclimating the planks to the room’s environment is crucial. Allow the planks to sit in the room where they’ll be installed for at least 48 hours. This step ensures the wood adjusts to the room’s moisture levels, preventing expansion or contraction once installed.
Start by sketching the herringbone pattern on paper to achieve a balanced, symmetrical look. Identify the starting point, usually the centre of the room, to ensure your pattern is aligned correctly. Mark this point with a chalk line, which will act as your guide for placement throughout the installation.

Use a chalk line to create a straight line along the centre of the room. This ensures your planks are laid out symmetrically and prevents misalignment as you work across the floor.
Depending on your chosen installation method, apply a layer of adhesive on the subfloor or lay down your underlay. Ensure to follow the manufacturer’s instructions for the glue and underlay.
Start by placing the first row of planks along the chalk line. Interlock the planks to form the herringbone pattern. Take your time to ensure the edges align perfectly. Use a rubber mallet to tap them into place without damaging the wood.
Continue laying the planks row by row. When you reach the end of a row, cut the last plank to fit using a circular saw or jigsaw. Remember to maintain consistent spacing between the planks using spacers to ensure the gaps are uniform.

Once the planks are in place, secure them by nailing them down or applying adhesive. For the best results, ensure each plank is firmly fixed to avoid movement or gaps.
Once all the planks are installed, it’s time to finish up. Install skirting boards or thresholds to cover the expansion gaps along the room’s edges. Ensure everything is neat and clean for a polished look.
Even with the best intentions, mistakes can happen. Here are some of the most common issues people face when installing herringbone flooring and how to avoid them:

Want your herringbone flooring to look like it was installed by a professional? Here are some insider tips:

If you’re aiming for an eco-friendly installation, consider the following:
Herringbone-engineered wood flooring isn’t just about looks—it’s about creating a durable, long-lasting foundation for your home. Whether adding elegance to your living room or making a bold statement in your hallway, this flooring style will surely impress.
By following the steps in this guide and investing in quality materials, you can create a stunning herringbone floor that adds value and charm to your space.
Want the best products for your installation? At The Flooring Masters, we offer premium herringbone engineered wood flooring, expert advice, and even free samples to help you get started. Contact us today to discover the perfect flooring for your next project.

Example One: Rectangle Rooms

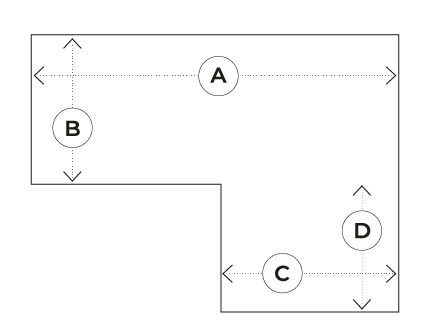
Example Two: Odd Shaped Rooms