How to Build a Wood Floor Countertop? Here’s How!

how to build a wood floor countertop

The internet is overflowing with DIY projects, and turning wood flooring into a countertop is one of the latest trends. At first glance, it seems like a genius idea—affordable, sustainable, and undeniably stylish. But is it practical, or will it turn into a maintenance nightmare?

A wood floor countertop comes with a mix of pros and cons. Additionally, it’s cost-effective compared to high-end countertops like quartz or granite, and repurposing wood makes it an eco-friendly choice. It can add warmth and a unique character to your kitchen or workspace. However, durability and maintenance are significant concerns. Wood is naturally porous, making it susceptible to moisture damage, stains, and scratches. The installation process also requires patience and skill, meaning it’s not the most straightforward DIY project.

This guide will help you decide if a wood floor countertop is right for you. And if you’re set on it, we’ll show you exactly how to build one that lasts.

The Brutal Truth: Why Wood Floor Countertops Aren’t for Everyone

Before you dive in, let’s be honest—this project isn’t for everyone. Just because it looks stunning in Pinterest photos doesn’t mean it’s the best practical choice for your kitchen.

  • Aesthetic vs. Practicality 

Wood countertops photograph beautifully, but keeping them in top shape takes effort. Unlike stone surfaces, they require frequent maintenance, including resealing and refinishing. If you love the idea of a ‘lived-in’ look, that’s great. But if scratches and wear will drive you crazy, this might not be the best option.

  • Moisture and Heat Sensitivity 

Wood expands, contracts, and absorbs moisture. This means spills must be wiped up immediately, and hot pans can’t be placed directly on the surface. Even with proper sealing, water exposure over time can cause warping and cracks.

  • DIY Overconfidence 

Not all DIY projects are as easy as they seem. Building a wood floor countertop requires precision. Mistakes in measuring, glueing, or sealing can lead to an unstable or unattractive surface.

→ Who Should Consider This Project? – A wood floor countertop can be an excellent DIY achievement if you love hands-on projects and don’t mind regular upkeep.

→ Who Should Avoid It? – If you prefer low-maintenance surfaces or don’t have the time for frequent resealing and refinishing, this project may not be for you.

how to build a wood floor countertop

Choosing the Right Wood (Because Not All Flooring Works)

A common mistake is assuming that wood flooring will work for a countertop. That’s far from the truth. Some woods are too soft, prone to warping, or coated with finishes that aren’t food-safe.

  • Best Woods: Hardwood species like oak, maple, and walnut are excellent choices. They are dense, durable, and less prone to damage.

  • Woods to Avoid: Softwoods like pine dent easily and absorb moisture. Prefinished planks are another bad choice, as their coatings may not be food-safe or suitable for cutting.

✅ Checklist Before You Start:

  • Is the wood thick enough? (At least ¾ inch for durability)
  • Is it free from cracks and warping?
  • Is it untreated or safely refinished for kitchen use?

The Prep Work That Will Make or Break Your Countertop

Proper preparation is key to ensuring your countertop lasts. Skipping steps here can lead to uneven surfaces, weak joints, and long-term damage.

  • Cleaning & De-Nailing – If you’re using reclaimed wood, remove any nails and clean the surface thoroughly. Leftover debris can damage your tools and affect adhesion.

  • Warping & Moisture Content – Wood needs to be dry and stable before use. Acclimate it to your home’s humidity levels for at least a week to prevent post-installation warping.

  • Why Sanding Matters – Sanding isn’t just about aesthetics. An uneven surface can trap bacteria, making the countertop harder to clean. Proper sanding ensures a smooth, safe work surface.

🚨 Common DIY Fails to Avoid:

  • Not drying wood properly before installation
  • Using warped or cracked planks
  • Skipping fine sanding leads to rough spots
how to build a wood floor countertop

The Assembly Process: Doing It Right the First Time

  • Gluing & Clamping Strategy – Use high-quality wood glue and apply even pressure with clamps. Clamping for at least 24 hours prevents weak joints.

  • Securing to the Base – Decide whether to float the countertop (allowing for expansion) or fix it permanently. Floating prevents cracking, while fixing it offers more stability.

  • Preventing Future Issues – Bevelled edges are less likely to chip than sharp, flush edges. Small design choices now can prevent big problems later.

The Hardest Part: Finishing & Sealing (Most People Get This Wrong)

A proper seal is what makes or breaks a wood floor countertop.

  • Choosing the Right Finish:
    • Food-Safe Oils (e.g., mineral oil, tung oil) – Natural but requires frequent reapplication.
    • Polyurethane – Durable and water-resistant but may not be food-safe.
    • Epoxy Resin – Extremely durable and waterproof but expensive and tricky to apply.
  • Waterproofing Tips:
    • Apply multiple thin layers of sealant rather than one thick coat.
    • Sand lightly between coats for a smooth finish.
  • Professional Longevity Hacks:
    • Use a cutting board instead of chopping directly on the surface.
    • Reapply oil or finish every few months.

The Harsh Reality of Maintenance (Are You Ready?)

A wood countertop isn’t a ‘set and forget’ option. Regular upkeep is required.

  • Why DIY Wood Countertops Often Fail: Poor sealing, water damage, and improper cleaning lead to early deterioration.

  • Protecting Against Scratches & Heat: Always use trivets for hot pans and avoid dragging heavy items across the surface.

🚀 Pro Maintenance Checklist:

  • Wipe spills immediately
  • Reseal every 6–12 months
  • Avoid harsh chemicals

Alternative Options: What If This Isn't Worth the Hassle?

      • Alternative DIY Materials: Concrete, laminate, or stone-look epoxy can be more durable.
      • Cost Breakdown: DIY vs. Hiring a Professional – A DIY wood floor countertop may cost £100–£300, whereas a professionally installed butcher block could start at £500.
      • Butcher Block vs. Wood Flooring Countertops: Butcher block is specifically designed for countertops and is a better long-term choice.

Final Verdict: Should You Build a Wood Floor Countertop?

For hands-on DIYers who enjoy maintaining their home projects, a wood floor countertop can be a rewarding build. You should reconsider if you’re looking for a hassle-free surface. Either way, now you have all the information to make the right choice!

At The Flooring Masters, we offer high-quality wood flooring options that can be the perfect base for your DIY projects. Our Expert Advice Centre is here to guide you every step of the way. Plus, take advantage of our Free Sample option to ensure you’re making the best decision for your home. Get started today and build with confidence!

MORE ARTICLES

  • Mon - Fri: 9am - 7pm

    Sat: 9am - 5pm

    Sunday: closed

    How to measure my room

    Example One: Rectangle Rooms

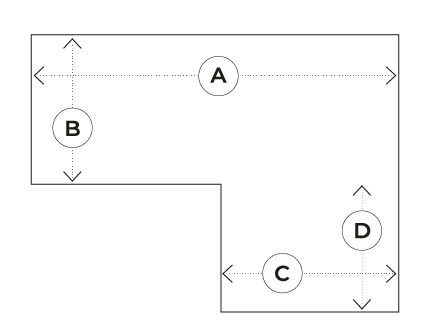
    Example Two: Odd Shaped Rooms

    Don't forget to add an extra 10%
    to the total area(m2) to account for any wastage