Think back to when you last tackled a home project and felt a bit overwhelmed—like measuring your room for new flooring. It might seem like a small detail, but getting it right is crucial. A misstep here can lead to extra costs or delays, which is the last thing anyone wants when they’re excited about a new floor.
We know how daunting it can be, which is why this guide is to help you navigate the process smoothly. We’ll break down each step with clear, practical tips and simple instructions. Whether you’re a DIY enthusiast or just looking to get the measurements right before calling in the pros, this guide will make sure you’re prepared and confident. By the end, you’ll be ready to tackle your flooring project with ease.

One of the most crucial steps when planning to install new flooring is taking accurate measurements. Precision in this process can make all the difference between a smooth, cost-effective installation and a frustrating, expensive one. Let’s explore why accurate measurements matter and how you can avoid common pitfalls.
Accurate measurements ensure that you order the right amount of flooring material for your project. Miscalculating can lead to overordering, which means spending more than necessary on extra material. On the other hand, underordering results in delays, as you may need to place additional orders, which can incur extra shipping costs. Both scenarios can disrupt your project timeline and budget.
Different flooring types—whether it’s planks, tiles, or carpets—require specific measurement techniques. For instance, engineered wood planks may be sold by the square metre, while carpets may come in rolls. Knowing the type of flooring you plan to use is essential when measuring your space. This allows you to plan accordingly for any cutting or trimming that might be necessary to achieve a perfect fit.
To achieve precise measurements, having the right tools at hand is critical. Let’s take a look at the must-have items for measuring your room accurately.
Each of these tools serves a purpose in making the process easier and more accurate. For example, a tape measure allows for flexibility when navigating tight spaces, while a laser measure provides precise readings over long distances. Writing down your measurements ensures nothing is forgotten or misremembered, while a calculator ensures your square meterage is spot on.

Taking the right steps is key to getting accurate measurements for your flooring. Here’s a simple, step-by-step guide that’ll make the process straightforward and manageable.
Start by decluttering the room to ensure you have a clear view of the walls and floor. Move any furniture that could obstruct the measurement process. This will give you the most accurate readings and make the process easier.
For square or rectangular rooms, measuring is relatively simple. Here’s what to do:
For example, if the room is 5 metres long and 4 metres wide:
| Length (m) | Width (m) | Total Area (m²) |
|---|---|---|
| 5 | 4 | 20 |
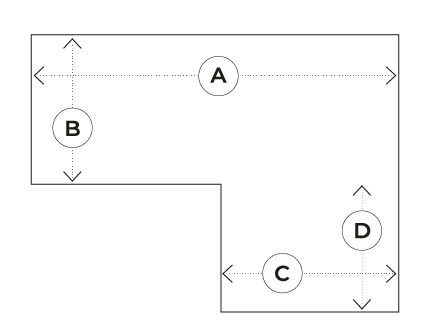
For irregularly shaped rooms, such as L-shaped spaces or rooms with alcoves, break the room into smaller, rectangular sections. Measure each section separately, then add the areas together.
For instance:
| Section | Length (m) | Width (m) | Area (m²) |
|---|---|---|---|
| A | 3 | 4 | 12 |
| B | 2 | 2 | 4 |
| Total Area | 16 m² |
This method ensures you cover every part of the room without missing any small areas.
It’s always a good idea to add 5-10% to your total measurement to account for waste, cutting errors, and potential future repairs. This extra material will save you from having to reorder small amounts later on.
For example, if your total room measurement is 20m², an additional 10% would mean ordering 22m² to ensure you have enough material.

Online flooring calculators are helpful tools for double-checking your measurements. Simply input your room’s length and width, and the calculator will determine the area for you. These tools are especially useful if you are working with multiple rooms or irregular shapes, as they can save you the hassle of manual calculations.
Here are a few online calculators that can help with room flooring calculations:
Both calculators are user-friendly and can help you accurately estimate the amount of flooring you need based on your room’s dimensions.
If you’re working with different units, it’s essential to know how to convert between metric and imperial measurements. Here’s a quick conversion table for reference:
| Metric (m) | Imperial (Ft) |
|---|---|
| 1 metre | 3.28 feet |
| 5 metre | 16.40 feet |
| 16.40 feet | 32.81 feet |
Having this handy can save you time and confusion when communicating with suppliers or contractors using different measurement systems.
Even the most experienced DIYers can make mistakes when measuring. Avoid these common errors for the best results.
Now that you’ve learned the importance of precise measurements and how to do it correctly, you’re ready to move forward with your flooring project confidently. Here’s a quick recap of the key points:
With your measurements in hand, it’s time to find the perfect flooring for your home. At The Flooring Masters, we offer a wide range of high-quality flooring options, designed to fit any room and style. Whether you prefer engineered wood or something else, our expert team can help you select the best choice based on your room’s unique dimensions.

Example One: Rectangle Rooms

Example Two: Odd Shaped Rooms